Developer Guide
This section contains guidance for developing NeuroCAAS
To contribute to NeuroCAAS, please contact us at neurocaas@gmail.com
1. Project Structure
This project utilizes two django apps, Account and Main. The Account app handles user management, and the Main app has core functions to process data.
2. Deployment on Ubuntu Server
Refer to this link for additional assistance.
Install essential packages:
$ sudo apt update
$ sudo apt install python3-pip python3-dev libpq-dev postgresql postgresql-contrib nginx curl
Install virtualenv:
$ sudo pip3 install virtualenv
$ cd /home/ubuntu/ncap
$ virtualenv venv
$ source venv/bin/activate
$ pip install –r requirements.txt
$ sudo ufw allow 8000
$ deactivate
Clone the repo
$ git clone https://github.com/jjhbriggs/neurocaas_frontend ncap
Install dependencies
$ cd ncap
$ virtualenv venv
$ source  venv/bin/activate
(venv) $ pip install -r requirements.txt
Create systemd Socket and Service Files for Gunicorn
$ sudo nano /etc/systemd/system/gunicorn. Service
Add the following content and save:
[Unit]
Description=gunicorn daemon
Requires=gunicorn.socket
After=network.target

[Service]
User=ubuntu
Group=www-data
WorkingDirectory=/home/ubuntu/ncap
ExecStart=/home/ubuntu/ncap/venv/bin/gunicorn \
                  --access-logfile - \
                  --workers 3 \
                  --bind unix:/run/gunicorn.sock \
                  ncap.wsgi:application
[Install]
WantedBy=multi-user.target
$ sudo systemctl daemon-reload
$ sudo systemctl restart gunicorn
Configure Nginx to Proxy Pass to Gunicorn
Install Nginx
$ sudo apt install nginx
Configure Nginx
$ sudo nano /etc/nginx/sites-available/ncap
Add following content and save:
server {
        listen 80;
        server_name www.neurocaas.com neurocaas.com neurocaas.org www.neurocaas.org;
        location = /favicon.ico { access_log off; log_not_found off; }
        location /static/ {
                        root /home/ubuntu/ncap;
        }
        location /docs/ {
                        alias /home/ubuntu/ncap/docs/build/html/;
                        index  index.html index.htm;
        }
        location / {
                        include proxy_params;
                        proxy_pass http://unix:/run/gunicorn.sock;
         }
}
$ sudo ln -s /etc/nginx/sites-available/ncap /etc/nginx/sites-enabled
$ sudo nginx –t
$ sudo systemctl restart nginx
$ sudo ufw delete allow 8000
$ sudo ufw allow 'Nginx Full'
Environment Variables
A set of valid AWS keys is needed to run tests properly. These should be set in .bash_profile.
Add these lines to your .bash_profile in the home directory (with your keys in place of the placeholders). Travis CI has a similar set of environement variables in its project settings which are used for testing, however local testing requires that the developer source bash_profile by running:
source .bash_profile
export AWS_ACCESS_KEY=<placeholder>
export AWS_SECRET_ACCESS_KEY=<placeholder>
Cron Job
There is a python script located “/home/ubuntu/ncap/cron.py”. It is running daily, removing old files in “/home/ubuntu/ncap/static/downloads” folder.
There is an additional python script called db_backup.py that backups the database to an s3 bucket daily.
Run the following command to edit crontab config (with <placeholder>s replaced with the AWS keys used to access your s3 bucket.
$ crontab –e
Add these line and save:
AWS_ACCESS_KEY=<placeholder>
AWS_SECRET_ACCESS_KEY=<placeholder>
5 4 * * * /usr/bin/python3 /home/ubuntu/ncap/cron.py >> ~/cron.log 2>&1
0 0 * * * /usr/bin/python3 /home/ubuntu/ncap/db_backup.py >> ~/cron_db.log 2>&1
Start Cron job
$ sudo service cron start
3. Database Information
Currently the database used in NeuroCAAS is sqlite. The DB configuration is stored in ncap/settings.py.
To migrate the database, run the following in the command line:
python3 manage.py migrate
Database Diagram:
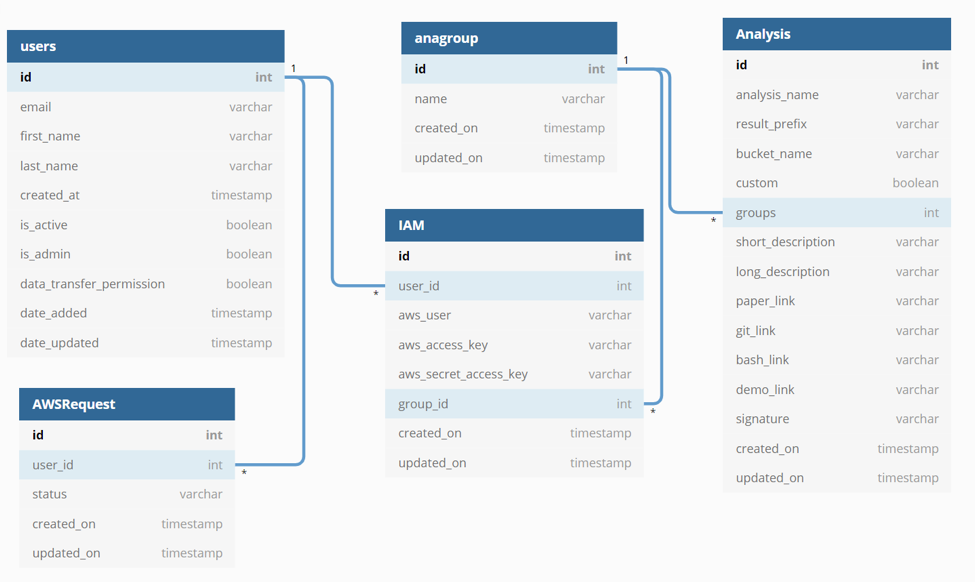
Additionally, Django stores a hashed password for every user. See the Django documentation on this for more information: https://docs.djangoproject.com/en/3.0/topics/auth/passwords/
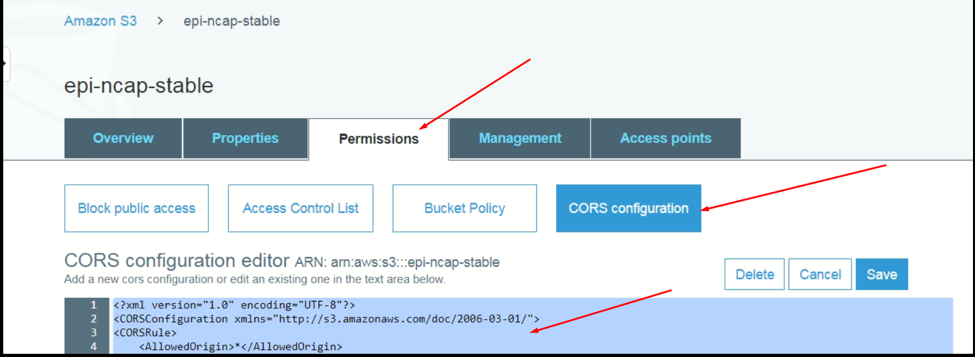
4. AWS S3 File Uploading
File uploading is done using a multipart upload based on the aws sdk javascript plugin (https://sdk.amazonaws.com/js/aws-sdk-2.617.0.min.js). All functions needed to perform uploading are stored inside a js file named “file_upload.js” inside the “static/js/fileupload” folder.
Multiple large files can be uploaded via this drag and drop box. To upload file to the s3 bucket, we need to add following permission on s3 bucket.
This allows users to upload files directly through a web browser.
<?xml version="1.0" encoding="UTF-8"?>
<CORSConfiguration xmlns="http://s3.amazonaws.com/doc/2006-03-01/">
<CORSRule>
    <AllowedOrigin>*</AllowedOrigin>
    <AllowedMethod>GET</AllowedMethod>
    <AllowedMethod>PUT</AllowedMethod>
    <AllowedMethod>POST</AllowedMethod>
    <AllowedMethod>DELETE</AllowedMethod>
    <MaxAgeSeconds>3000</MaxAgeSeconds>
    <ExposeHeader>ETag</ExposeHeader>
    <AllowedHeader>*</AllowedHeader>
</CORSRule>
</CORSConfiguration>
5. Automated IAM Management
Actions it can perform:
Automatically add an IAM to a new analysis group (registers with django db and creates new cloudformation resources)
Automatically add an IAM to an existing analysis group (registers with django db and adds to existing cloudformation resources)
Delete an IAM (removes it from django db and cloudformation resources)
Actions it can’t perform:
Automatically add an IAM to any user which was created before these tools were created (as it won’t have the proper supporting variables setup)
Automatically add an IAM to any group which was created without this automation tool (as the backend cloudformation stacks will be named incorrectly)
Remove an IAM which was created before these tools were created
Remove an entire Ana Group. (E.x. Even if all members of a group are removed, the group will remain as well as its cloudformation resources. Removing these must be done manually
Additionally, if a user that is attached to an IAM is removed, the iam will not be removed with it, instead it will be associated to no user. Remove the IAM before removing the user.
In short, use the tool only on new groups, iams, and users. Groups/iams/users made prior to the tool can be edited manually to work with the tool, but it will return errors when operating on anything old until this migration is performed.
Step 1: Go to the user panel in the admin dashboard
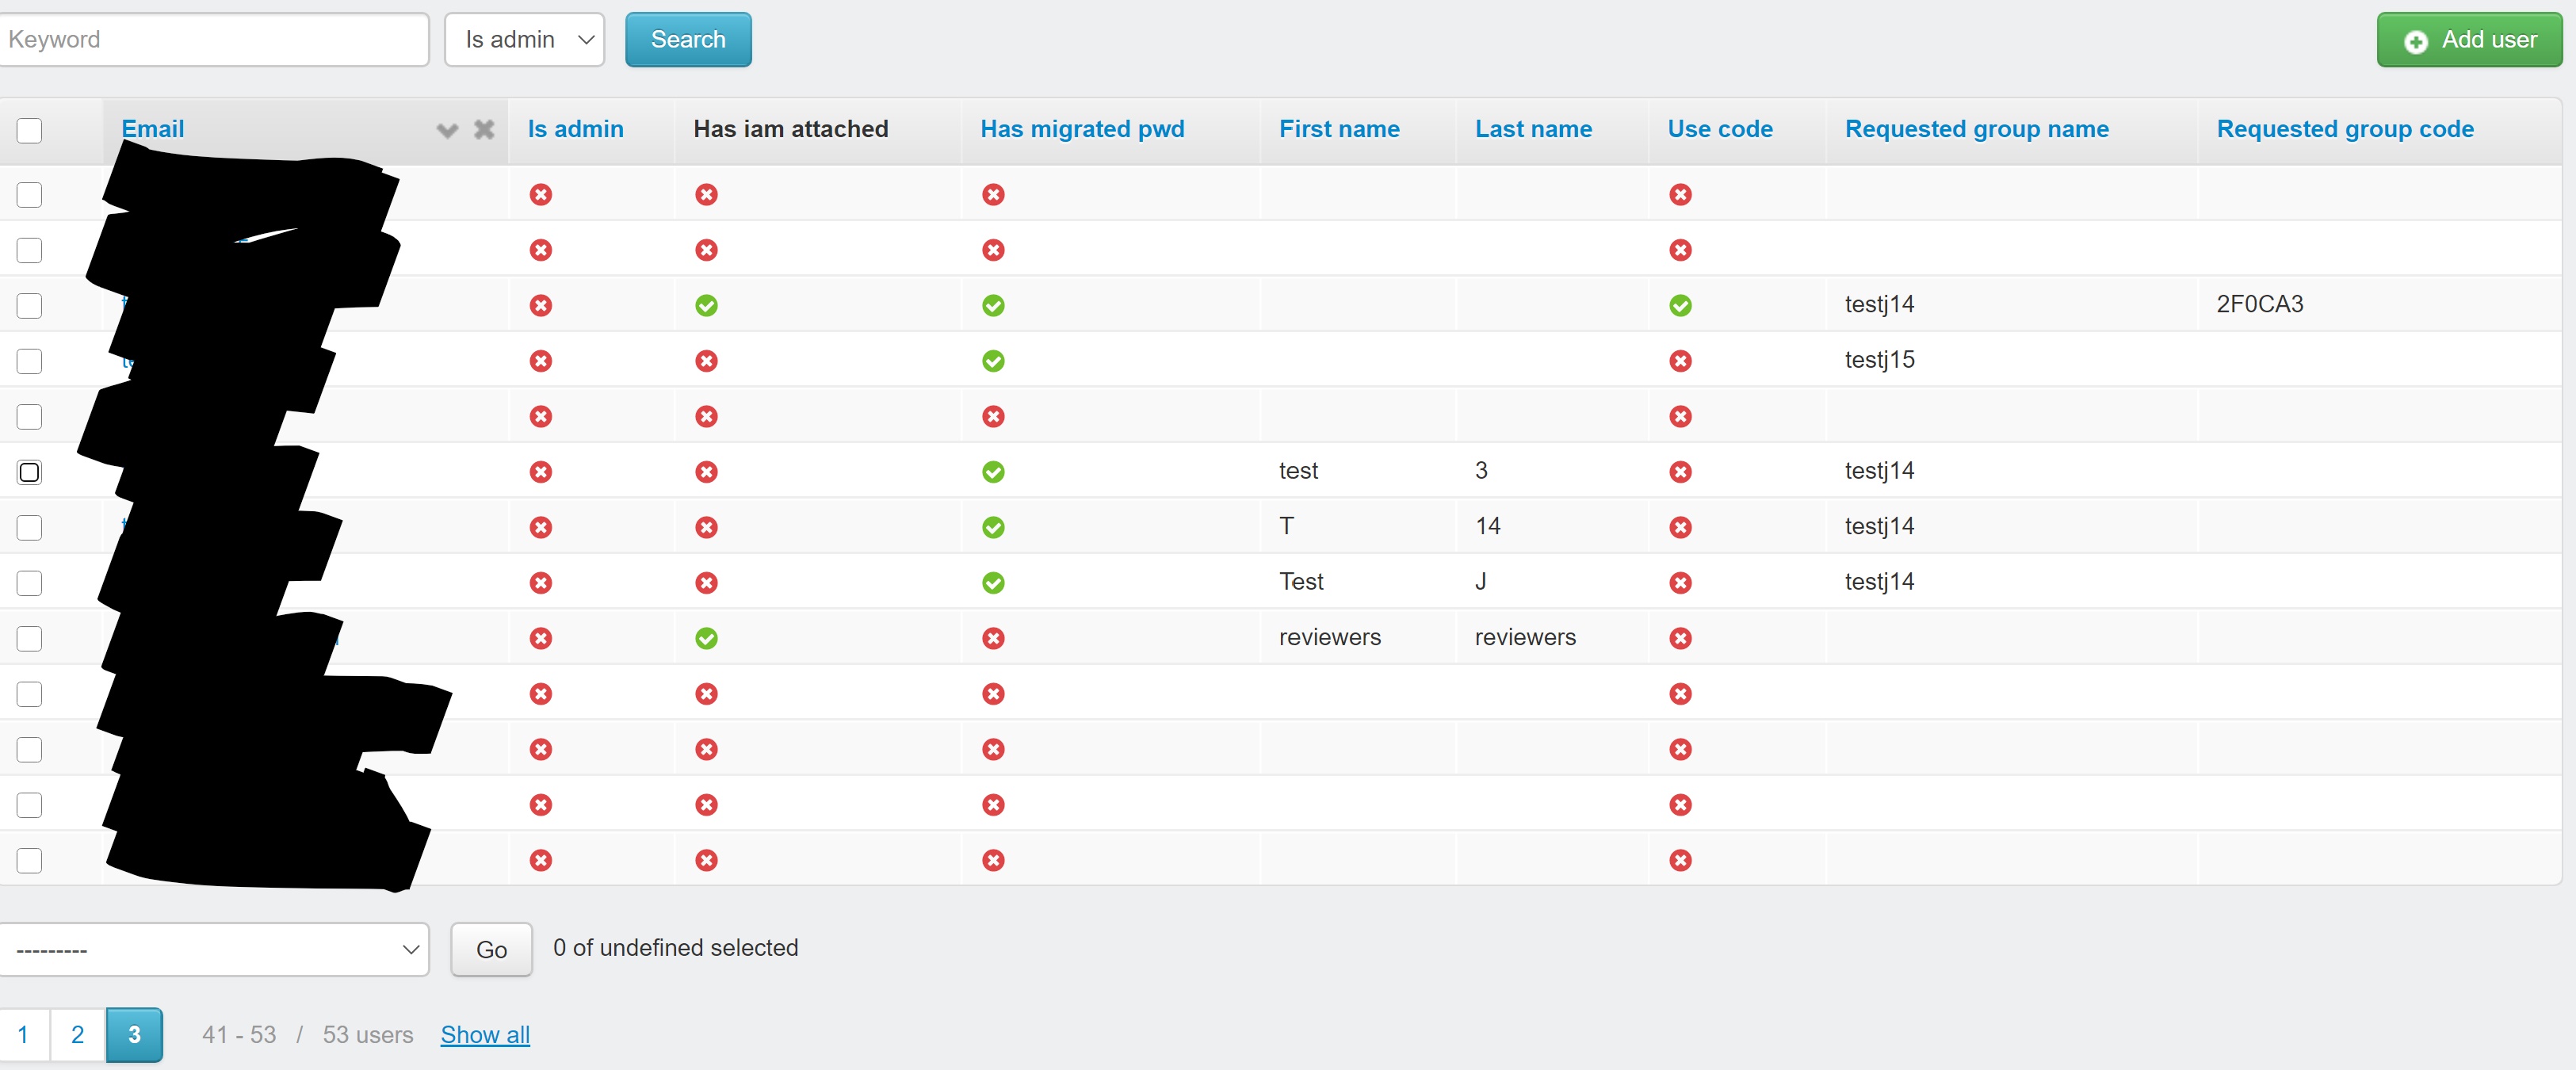
Step 2: Select one or more users to give or remove an iam

Note the variables at the top, specifically Has IAM attached, which will help the user know if their operation was successful, and an IAM was created for that user. This is a constantly updated function, so no page reload should be necessary to see updates to this variable.
Requested Group Name is the group which the user’s new IAM will be added to, and can be edited to add a user to a different group.
Requested group code (optional), is only used in the user signup phase to automatically assign the requested group name based upon the group code (because the system prevents you just joining an existing group by name at signup).
The Use code variable is also only used at signup, and assists in determining whether to use the inputted name or code.
Step 3: Select an action and press go.
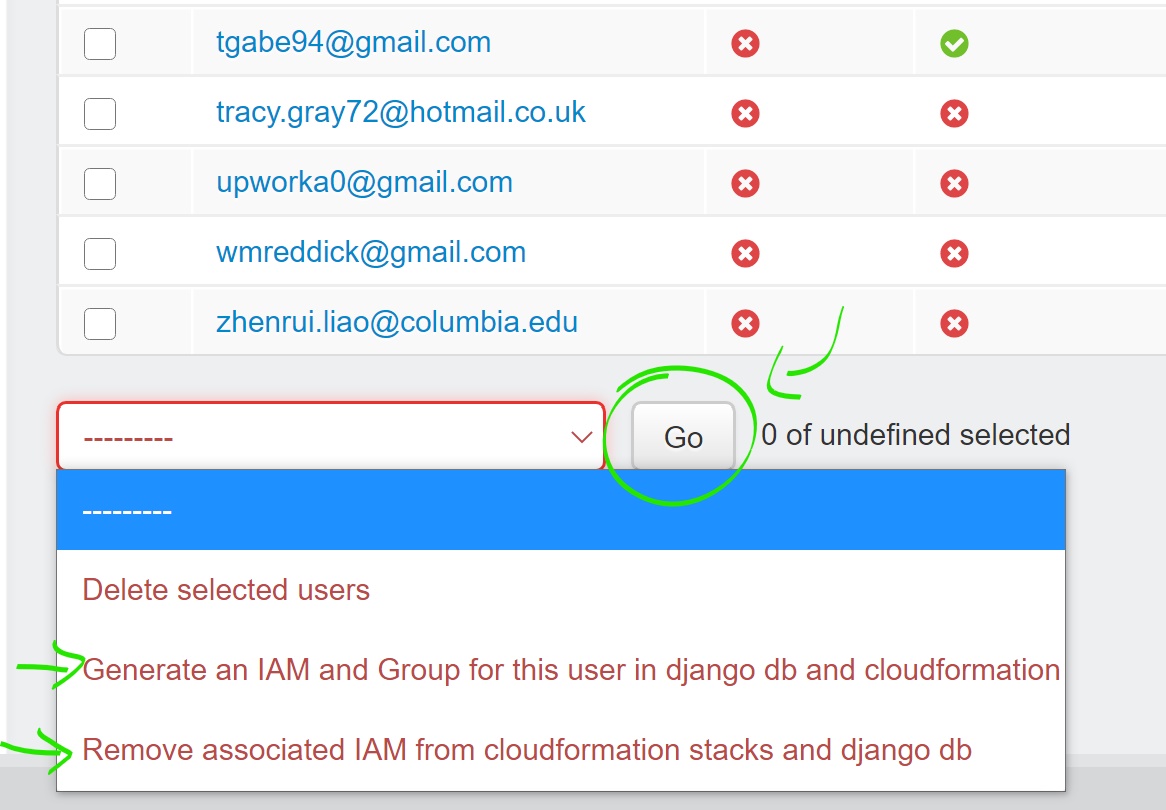
A message (or an error) should now appear at the top looking something like this, notifying you of the started process, which will run in a subprocess on the ec2 instance.
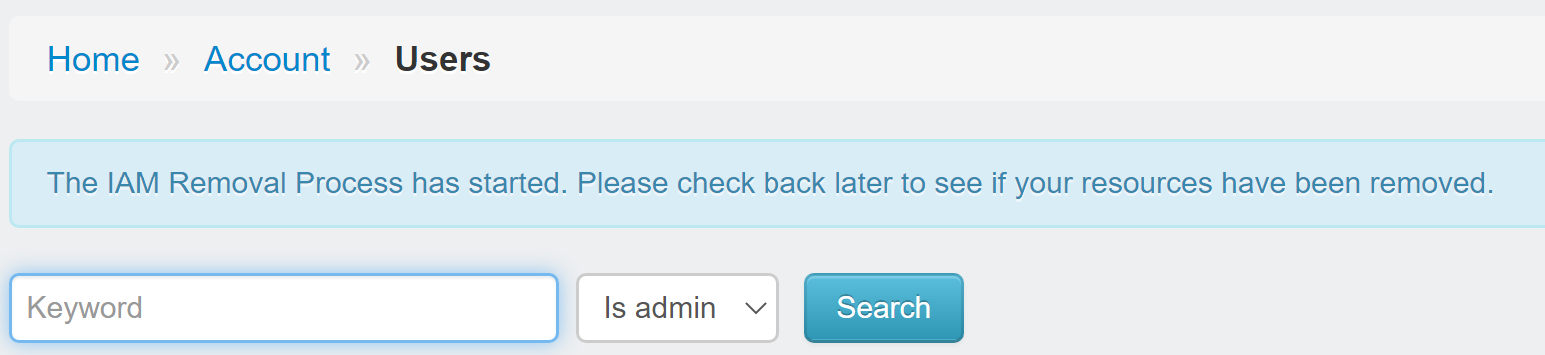
Wait a few minutes for your action to complete (more if you are adding/removing multiple IAMs at once), but if its clear that the process failed, then you can check the error logs in the ‘ncap/logs’ directory of the instance. While there are error and output logs for each action, they will both contain parts of the errors and outputs (because oddly some scripts log their output to std error).
Key Resources:
Local cloned instance of the NeuroCAAS Project
The logs folder
The user credentials folder
The user addition Django management command
The modified deploy.sh script
The admin action for adding and deleting IAMs
To replicate this process on a new instance, all that needs to be done is as follows:
Create a folder named ‘logs’ in the project root folder (‘~/ncap’)
Create an appropriately named folder to store user credentials in, stored in the project root folder
Clone the main NeuroCAAS project onto the instance, stored in the project root folder
Navigate to neurocaas/ncap_iac/user_profiles/iac_utils and edit the deploy.sh so that the last 4 lines look like so:
#These should be modified
cd $ncaprootdir/utils
python export_credentials.py $PIPEDIR "../../../credentials_folder_from_step_1/"
#These should be added
cd ~/ncap
python manage.py register_creds $PIPEDIR
Navigate to the neurocaas folder and run:
install requirements.txt
Dxecute aws configure and provide the proper details to setup the aws cli
aws configure
Install other dependencies
sudo apt install jq
pip install aws-sam-cli==1.0.0
pip install docker==4.2.1
Setup docker
sudo systemctl start docker
sudo systemctl enable docker
sudo systemctl status docker
sudo usermod -a -G docker ubuntu
Restart the shell, execute ‘docker ps’, and verify that your shell looks like this:
CONTAINER ID IMAGE COMMAND CREATED STATUS PORTS NAMES
Restart Nginx and Gunicorn
- General Process (IAM Addition):
An admin action to create a new IAM for a user is called
The admin action checks to ensure it is a valid request (ex. if the user already has an IAM it will be return an error)
The admin action creates the proper local resources for the creation of the cloudformation resources
The admin action calls the deploy.sh script which deploys the cloudformation resources (creating the IAM on the AWS side)
The deploy.sh script then calls a django management command which creates the IAM model locally and registers it with the django db
Outputs and Issues are stored to the logs folder
- General Process (IAM Removal):
An admin action to remove an IAM from a user is called
The admin action checks to ensure it is a valid request (ex. if the user doesn’t have an IAM it will be return an error)
The admin action removes the proper local resources for the creation of the cloudformation resources
The admin action calls the deploy.sh script which reddeploys the cloudformation resources (removing the IAM on the AWS side)
The admin action deletes the IAM from the django db
Outputs and Issues are stored to the logs folder
More specific details can be found in the admin action and management command code.